Style Transfer on ONNX Models with OpenVINO

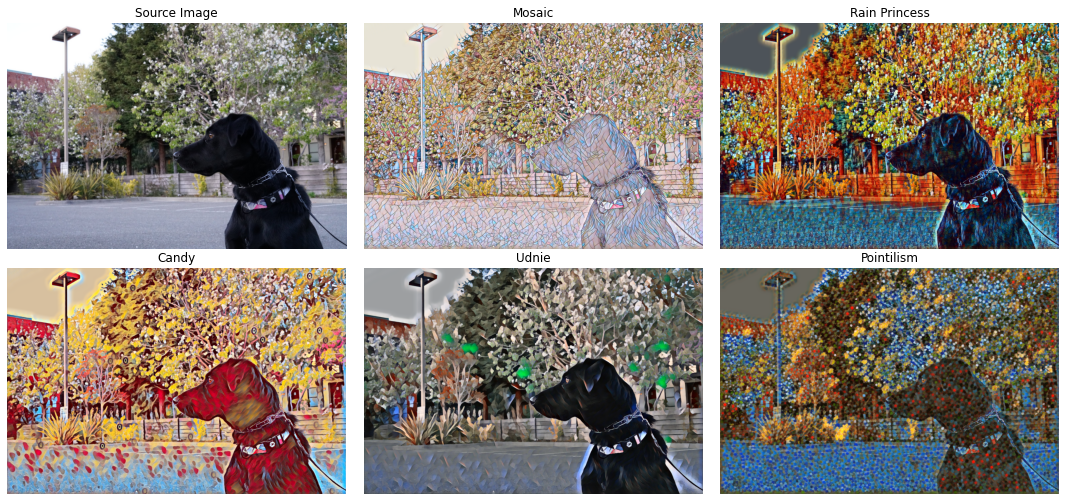
Neural Style Transfer network output
This notebook demonstrates Fast Neural Style Transfer on ONNX models with OpenVINO. Style Transfer models mix the content of an image with the style of another image.
For this notebook, we use five pretrained models, for the following styles: Mosaic, Rain Princess, Candy, Udnie and Pointilism. The models are from the ONNX Model Repository and are based on the research paper Perceptual Losses for Real-Time Style Transfer and Super-Resolution by Justin Johnson, Alexandre Alahi and Li Fei-Fei.
Preparation
Imports
import sys
from enum import Enum
from pathlib import Path

import cv2
import matplotlib.pyplot as plt
import numpy as np
from IPython.display import HTML, FileLink, clear_output, display
from openvino.runtime import Core, PartialShape
from yaspin import yaspin

sys.path.append("../utils")
from notebook_utils import download_file
Download Models
The Style Enum lists the supported styles with url, title and model
path properties. Models for all supported styles will be downloaded to
MODEL_DIR if they have not been downloaded before.
BASE_URL = "https://github.com/onnx/models/raw/main/vision/style_transfer/fast_neural_style/model"
MODEL_DIR = "model"


class Style(Enum):
    MOSAIC = "mosaic"
    RAIN_PRINCESS = "rain-princess"
    CANDY = "candy"
    UDNIE = "udnie"
    POINTILISM = "pointilism"

    def __init__(self, *args):
        self.model_path = Path(f"{self.value}-9.onnx")
        self.title = self.value.replace("-", " ").title()
        self.url = f"{BASE_URL}/{self.model_path}"
for style in Style:
    if not Path(f"{MODEL_DIR}/{style.model_path}").exists():
        download_file(style.url, directory=MODEL_DIR)
Load Image
Load an image with OpenCV and convert it to RGB. The style transfer
model will be resized to the image shape. This gives the most detailed
results, but for larger images, inference will take longer and use more
memory. The resize_to_max function optionally resizes the image to a
maximum size.
IMAGE_FILE = "data/coco_square.jpg"
image = cv2.cvtColor(cv2.imread(IMAGE_FILE), cv2.COLOR_BGR2RGB)


def resize_to_max(image: np.ndarray, max_side: int) -> np.ndarray:
    """
    Resize image to an image where the largest side has a maximum length of max_side
    while keeping aspect ratio. Example: if an original image has width and height of (1000, 500)
    and max_side is 300, the resized image will have a width and height of (300, 150).

    :param image: Array of image to resize
    :param max_side: Maximum length of largest image side
    :return: Resized image
    """
    if max(image.shape) <= max_side:
        new_image = image
    else:
        index = np.argmax(image.shape)
        factor = max_side / image.shape[index]
        height, width = image.shape[:2]
        new_height, new_width = int(factor * height), int(factor * width)
        new_image = cv2.resize(image, (new_width, new_height))
    return new_image


# Uncomment the line below to resize large images to a max side length to improve inference speed.
# image = resize_to_max(image=image, max_side=1024)
Do Inference and Show Results
For all five models: do inference, convert the result to an 8-bit image, show the results, and save the results to disk.
# Set SAVE_RESULTS to False to disable saving the result images.
SAVE_RESULTS = True

# find reasonable dimensions for matplotlib plot
wh_ratio = image.shape[1] / image.shape[0]
figwidth = 15
figheight = (figwidth * 0.75) // wh_ratio

# Create matplotlib plot and show source image
fig, ax = plt.subplots(2, 3, figsize=(figwidth, figheight))
axs = ax.ravel()
axs[0].imshow(image)
axs[0].set_title("Source Image")
axs[0].axis("off")

# Create Core instance, prepare output folder
ie = Core()
output_folder = Path("output")
output_folder.mkdir(exist_ok=True)

# Transpose input image to network dimensions and extract image name and shape
input_image = np.expand_dims(image.transpose(2, 0, 1), axis=0)
image_name = Path(IMAGE_FILE).stem
image_shape_str = f"{image.shape[1]}x{image.shape[0]}"

file_links = []
for i, style in enumerate(Style):
    # Load model and get model info
    model = ie.read_model(model=Path(MODEL_DIR) / style.model_path)
    input_key = model.input(0)

    # Reshape network to image shape and load network to device
    model.reshape({input_key: PartialShape([1, 3, image.shape[0], image.shape[1]])})
    compiled_model = ie.compile_model(model=model, device_name="CPU")
    output_key = compiled_model.output(0)
    # Do inference
    with yaspin(text=f"Doing inference on {style.title} model") as sp:
        result = compiled_model([input_image])[output_key]
        sp.ok("✔")

    # Convert inference result to image shape and apply postprocessing
    # Postprocessing is described in the model documentation:
    # https://github.com/onnx/models/tree/master/vision/style_transfer/fast_neural_style
    result = result.squeeze().transpose(1, 2, 0)
    result = np.clip(result, 0, 255).astype(np.uint8)

    # Show the result
    axs[i + 1].imshow(result)
    axs[i + 1].set_title(style.title)
    axs[i + 1].axis("off")

    # Optionally save results to disk
    if SAVE_RESULTS:
        image_path = f"{image_name}_{style.model_path.stem}_{image_shape_str}.png"
        output_path = output_folder / image_path
        cv2.imwrite(str(output_path), cv2.cvtColor(result, cv2.COLOR_BGR2RGB))
        file_link = FileLink(output_path, result_html_prefix=f"{style.title} image: ")
        file_link.html_link_str = "<a href='%s' download>%s</a>"
        file_links.append(file_link)

    del model
    del compiled_model

clear_output(wait=True)
fig.tight_layout()
plt.show()

if SAVE_RESULTS:
    output_path = output_folder / f"{image_name}_{image_shape_str}_style_transfer.jpg"
    fig.savefig(str(output_path), dpi=300, bbox_inches="tight", pad_inches=0.1)
    file_link = FileLink(output_path, result_html_prefix="Overview image: ")
    file_link.html_link_str = "<a href='%s' download>%s</a>"
    file_links.append(file_link)
    display(HTML("Saved image files:"))
    for file_link in file_links:
        display(HTML(file_link._repr_html_()))
 Saved image files:Mosaic image: output/coco_square_mosaic-9_2048x1366.png
Rain Princess image: output/coco_square_rain-princess-9_2048x1366.png
Candy image: output/coco_square_candy-9_2048x1366.png
Udnie image: output/coco_square_udnie-9_2048x1366.png
Pointilism image: output/coco_square_pointilism-9_2048x1366.png
Overview image: output/coco_square_2048x1366_style_transfer.jpg